
Our Projects
Here you'll find a collection of our DIY projects with detailed guides.
Project: Turn Nokia N95 into a Handheld Gaming Console
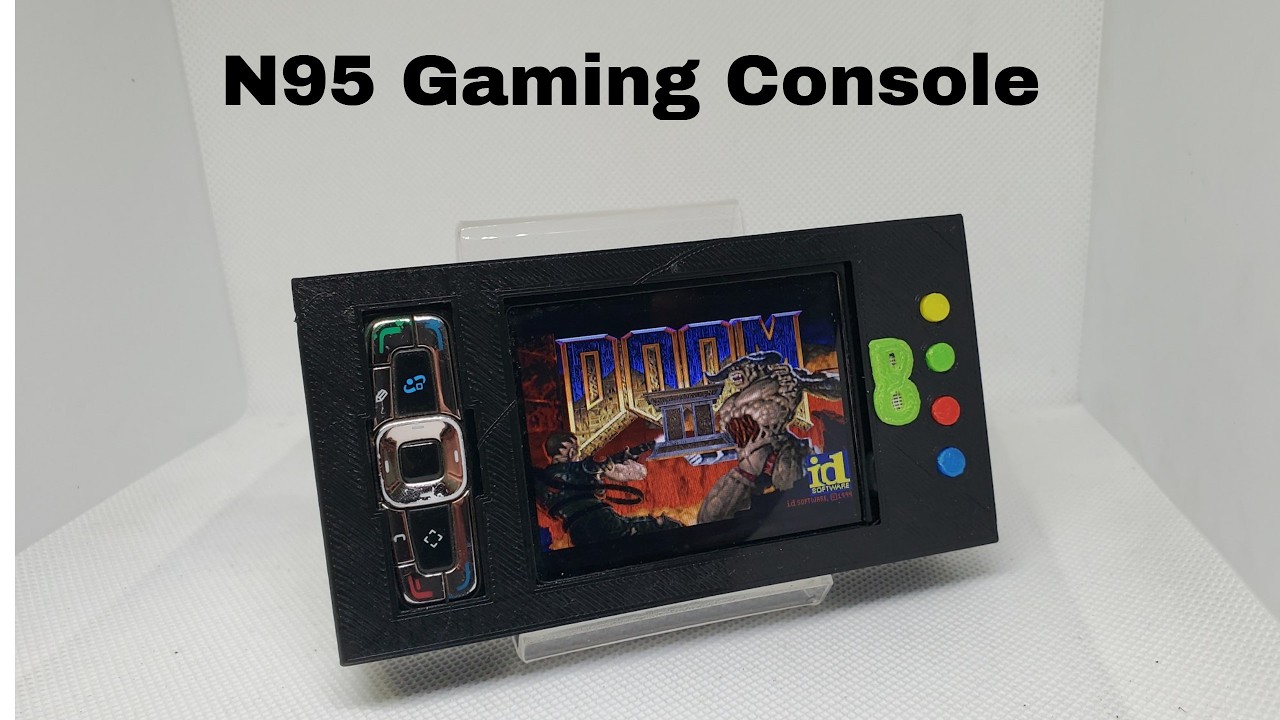
Overview:
This "no-soldering" mod transforms the iconic Nokia N95 into a landscape-oriented gaming handheld using a 3D-printed shell and software remapping.
Materials Needed:
- Nokia N95 (8GB version recommended)
- 3D Printer and filament for the custom shell
- Hacked Symbian OS (to install unsigned apps)
- Software: Magic Key (remapping) and Rotate Me (orientation)
Key Steps:
- 3D Printing & Assembly: Print the custom case and buttons. The phone slides into the shell with the screen open to expose the multimedia keys, which act as action buttons.
- Screen Orientation: Use Rotate Me to set the display to landscape mode, placing the D-pad on the left and action buttons on the right.
- Button Remapping: Use Magic Key to map the multimedia keys to numerical values (Play: 182, Stop: 183, Fast Forward: 184, Rewind: 185) so emulators recognize them.
- Gaming: Launch emulators like GPSP (GBA) or vSun (SNES). The N95's hardware accelerator allows it to run Quake 3 Arena and other intensive titles smoothly.
Downloads:
The 3D design files (STL and FreeCAD) are available for free to modify and use.
Link to the Freecad and STL files: Download Feel free to use and modify the design as you want!
Project: Samsung J7 to HDMI Monitor
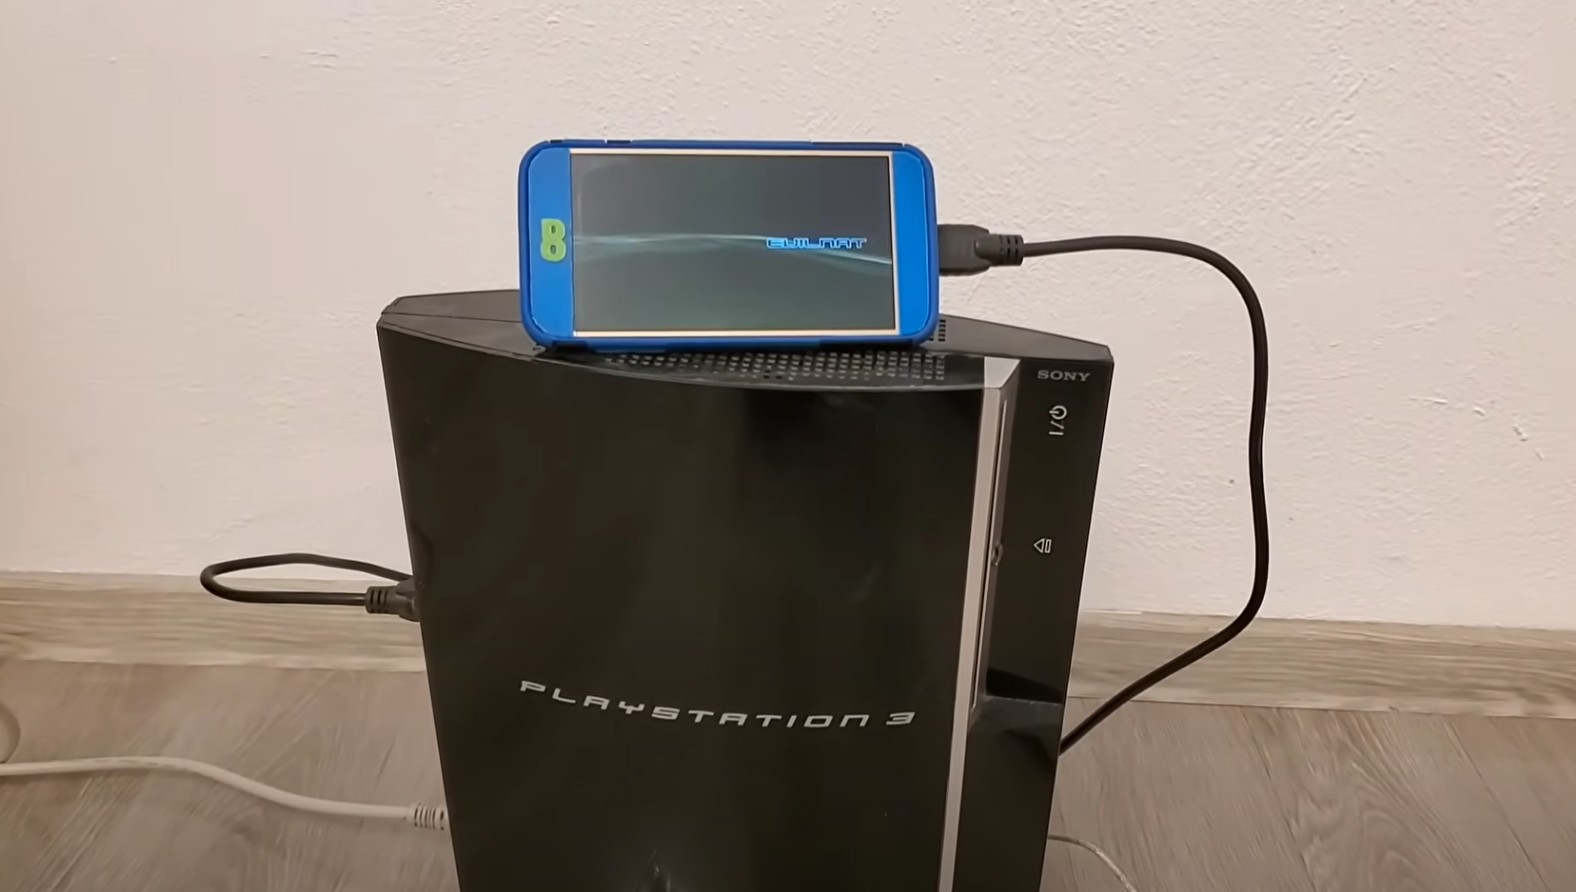
Initial Setup & Concept:
- The project uses a Samsung J7 with a broken screen but functional touch.
- An existing USB to HDMI capture card is used with a USB OTG adapter to initially demonstrate the phone acting as a display.
- The creator aims to embed the capture card inside the phone's existing blue case, which has a built-in stand.
Disassembly and Wiring:
- The phone is disassembled.
- The USB adapter and capture card are taken apart.
- The creator measures and determines the pinouts to directly solder wires from the phone's micro USB port to the capture card, bypassing the large USB connector.
- A thin wire, sourced from an old appliance's transformer coil, is used for soldering.
- A switch is incorporated to activate the USB host mode, allowing the phone to be charged when not used as an HDMI display.
- The wires are soldered and secured with hot glue.
Reassembly and Testing:
- The phone is reassembled.
- A quick test confirms the functionality, showing the color line on the screen when the capture card is activated.
- The case is marked and cut to accommodate the integrated components.
- The USB host switch is soldered and secured.
- 3D printed plastic pieces are used to cover the cutouts and the broken glass.
Project: Nokia E7 to Mini NES Console
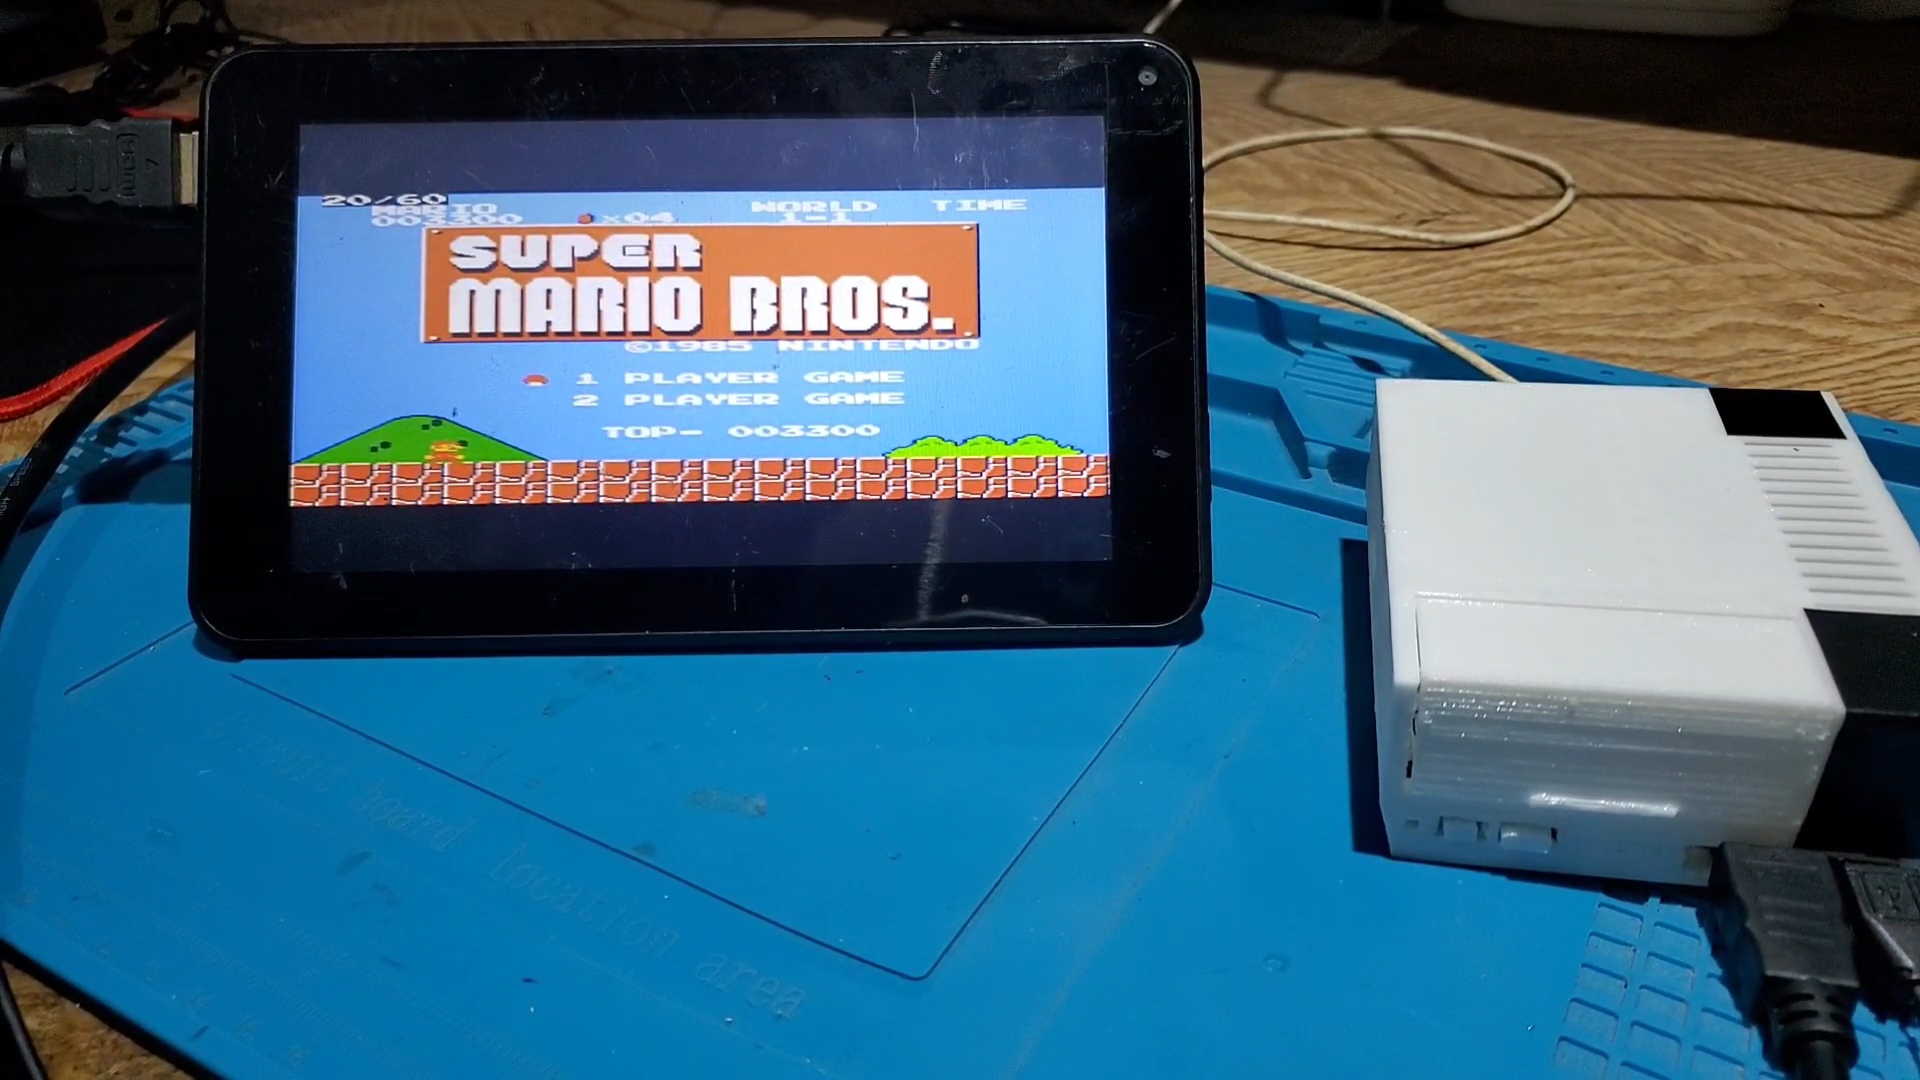
Materials You'll Need:
- Nokia E7 smartphone (with functional mini HDMI port and USB host)
- 3D printer and filament
- Soldering iron and solder
- USB Type-C port
- Voltage converter (to match phone's battery requirements)
- USB keyboard chip
- Wires
- Basic hand tools (screwdrivers, wire cutters, etc.)
Steps:
- Phone Selection and Initial Assessment:
- Choose a Nokia E7 that has a broken screen but a working mini HDMI port. The goal is to connect it to an external monitor.
- Verify the phone's functionality:
- Ensure it powers on.
- Test its ability to connect to an external HDMI display.
- Confirm its USB host function works (e.g., by connecting a USB keyboard).
- Display Modification for Booting:
The Nokia E7 requires its original display to be connected, even if broken, to boot properly.
Carefully extract the necessary components from the broken display:
- The ribbon cable.
- The small board containing the menu button. These components are crucial for the phone to boot and allow menu access.
- 3D Print the Console Case:
- Download a 3D model of an NES case (e.g., from Thingiverse).
- Use 3D modeling software (like Blender) to modify the case:
- Create cutouts to accommodate the Nokia E7's ports (HDMI, USB).
- Adjust or close any unnecessary cutouts (e.g., those designed for a Raspberry Pi).
- Print the modified NES console case using your 3D printer.
- Assemble the Console:
- Assemble the 3D-printed case.
- Solder custom power and menu buttons to the Nokia E7's internal board.
- Integrate a USB Type-C port into the console for power.
- Connect a voltage converter to the USB Type-C port to ensure the correct voltage is supplied to the phone's battery.
- Build the NES Controller:
- Download another 3D model for an NES controller.
- Print the controller casing.
- Integrate a USB keyboard chip into the controller.
- Solder buttons to the USB keyboard chip, mimicking the layout and function of an original NES controller (D-pad, A, B, Start, Select).
- Final Assembly and Testing:
- Connect the completed NES console and controller to an external display.
- Power on the console and test its functionality by playing NES games (e.g., Super Mario, Contra). Be aware that some lag and flickering might occur during gameplay.
This tutorial provides a general overview based on the video. For detailed instructions on soldering, 3D printing, and specific component placement, you may need to refer to more specialized guides or the original video itself.
Project: Old Android Tablet to Portable HDMI Screen
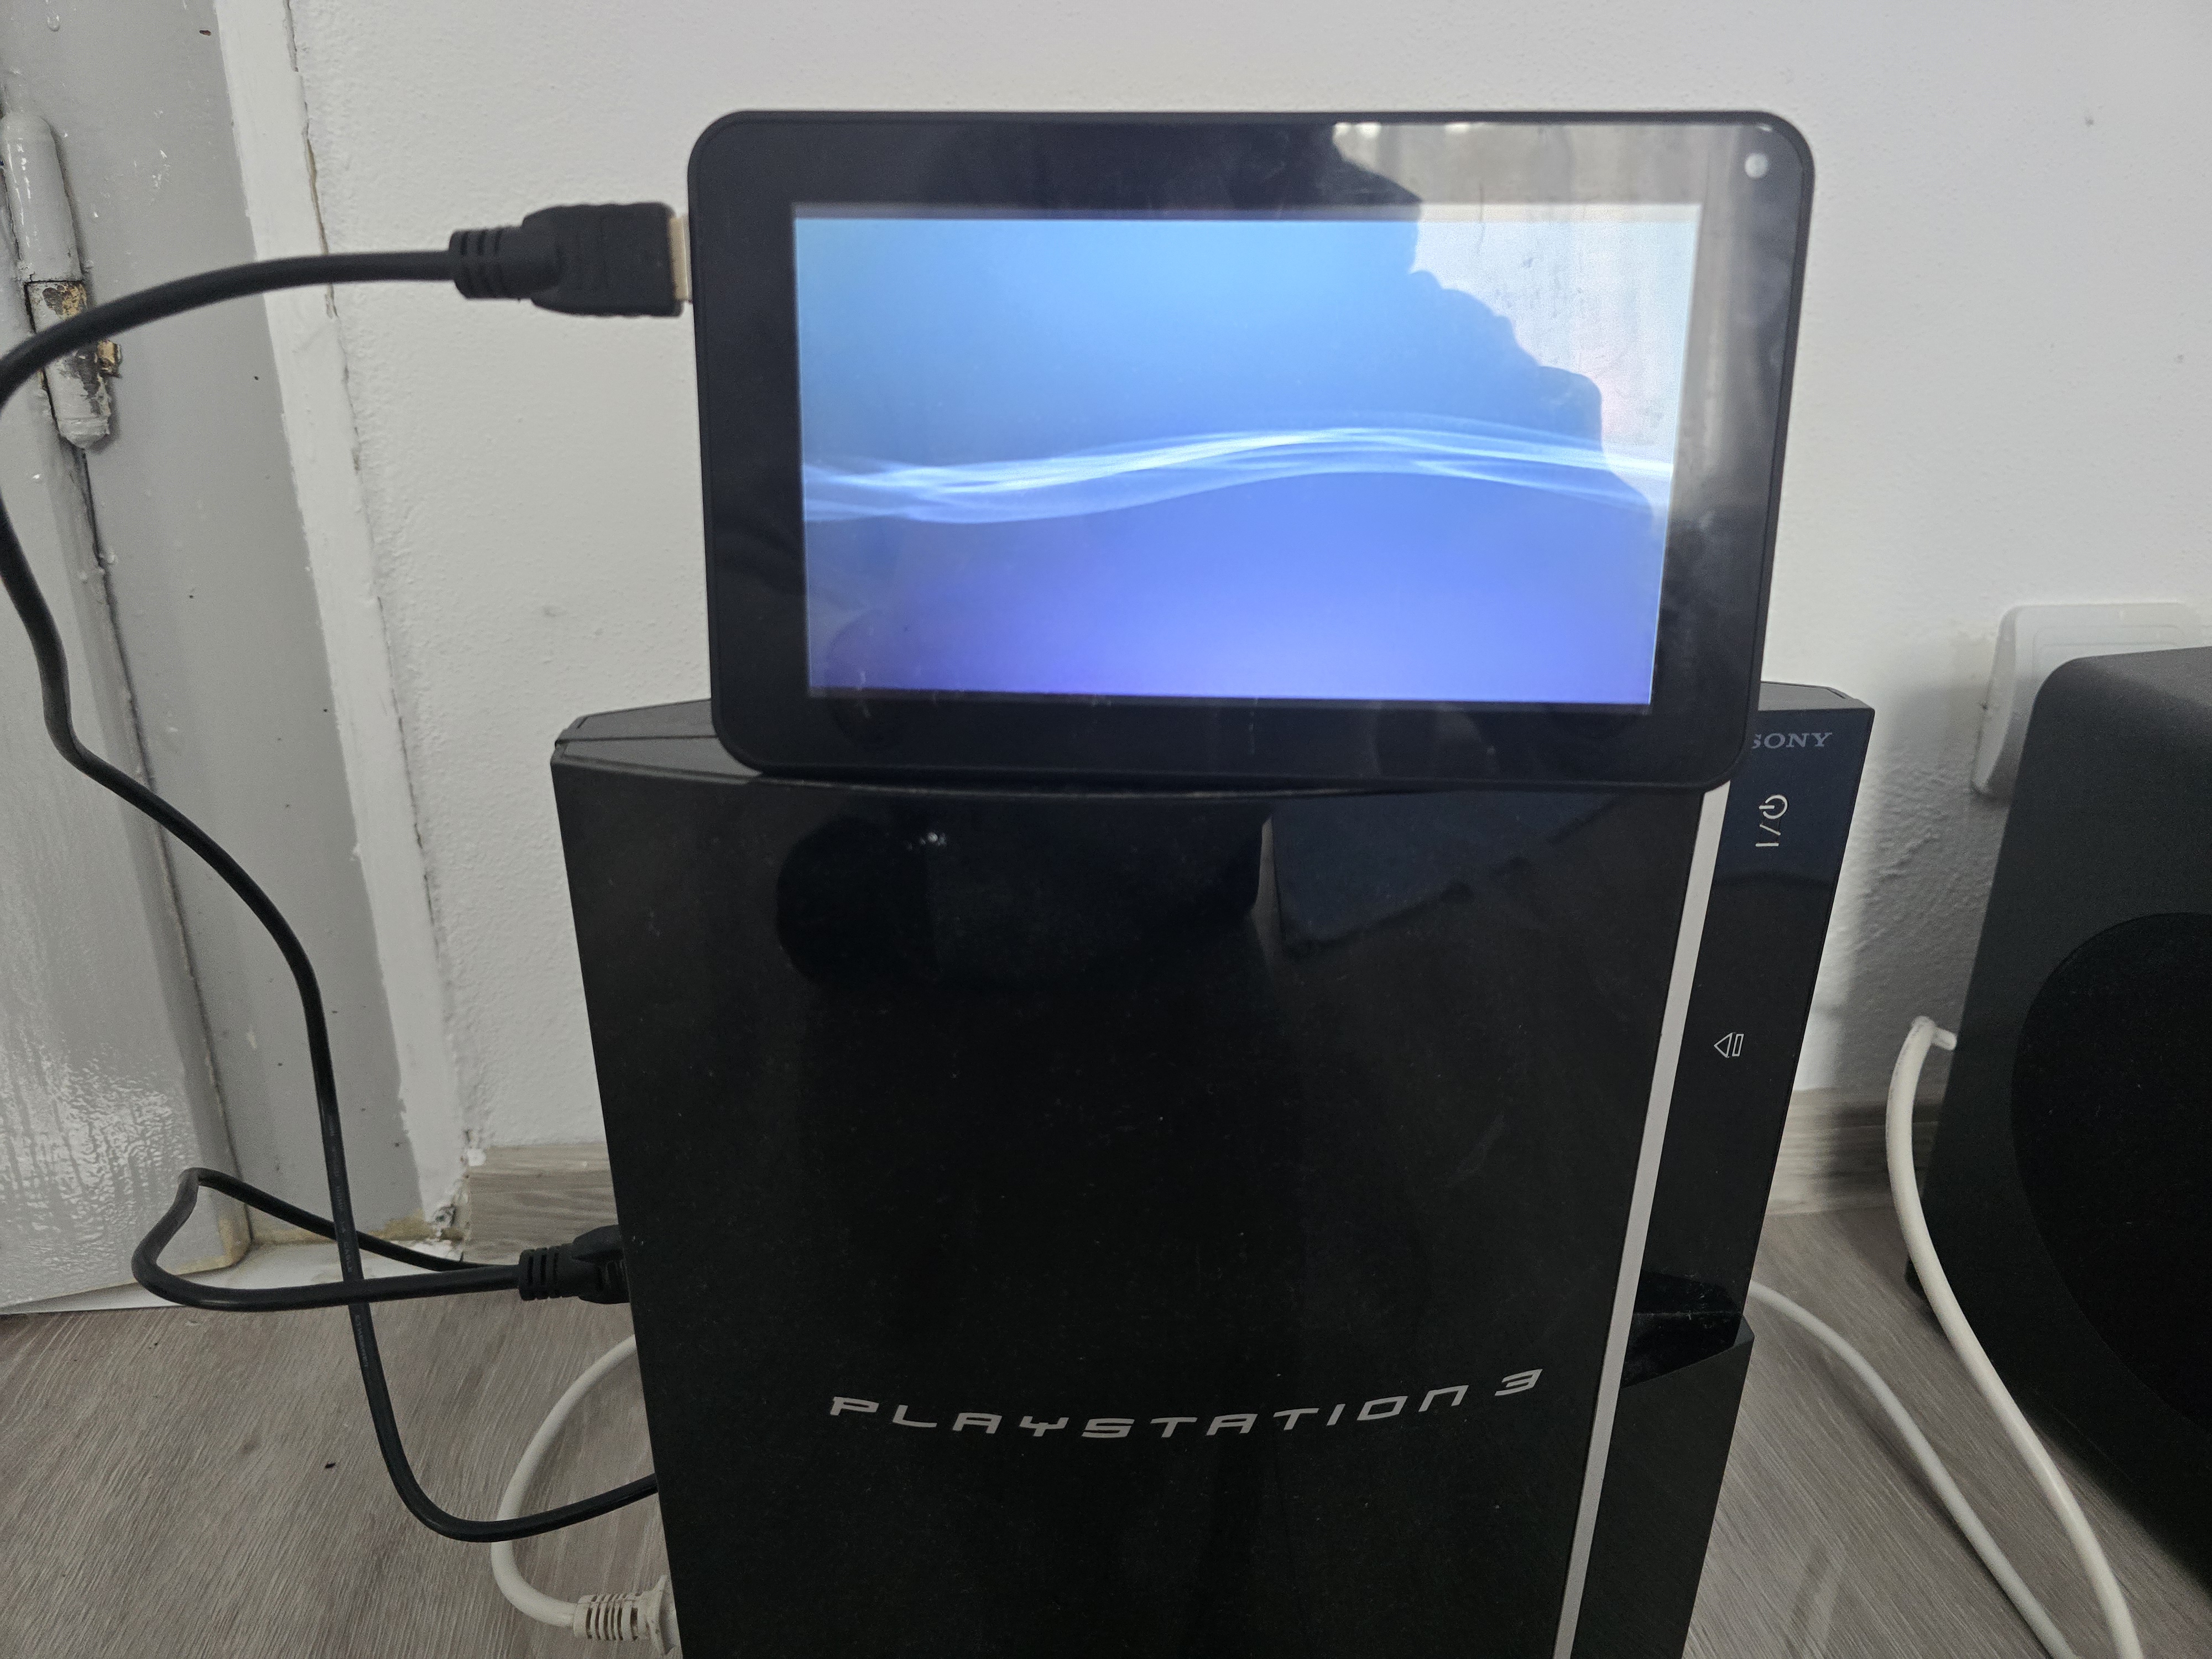
Materials You'll Need:
- Old Android tablet (quad-core CPU, 1GB RAM, Android 8.1, 1280x600 screen resolution, USB host functionality recommended)
- HDMI capture card
- Dremel tool or similar cutting tool
- Soldering iron and solder
- Wires
- Basic hand tools (screwdrivers, etc.)
Steps:
-
Tablet Selection and Initial Assessment:
- Choose an old Android tablet that meets the recommended specifications (quad-core CPU, 1GB RAM, Android 8.1, 1280x600 screen resolution).
- Crucially, ensure the tablet supports USB host functionality, as this will be used to connect the HDMI capture card.
-
Disassemble the Tablet:
- Carefully open the tablet's casing. The goal is to identify internal space where the HDMI capture card can be integrated.
-
Modify the Tablet's Casing:
- Using a Dremel tool, carefully remove plastic from the tablet's internal casing to create sufficient space for the HDMI capture card.
- Create a precise cutout on the back cover of the tablet for the HDMI port of the capture card, ensuring it's accessible from the outside.
-
Solder Connections to the Motherboard:
- This is a critical step requiring precision. Refer to the video's detailed schematic for the exact soldering points.
- Solder connections to the tablet's motherboard for USB power and data. This typically involves connecting:
- The positive (+) pin.
- The data pins (data+ and data-).
- The ground (-) pin.
- Integrate a switch for the USB host mode. This switch will allow you to toggle the USB host functionality, which is necessary for the HDMI capture card to work.
-
Assemble the Tablet with Integrated HDMI Capture Card:
- Carefully place the HDMI capture card into the newly created space within the tablet's casing.
- Securely connect all the soldered wires from the capture card to the tablet's motherboard.
- Close the tablet's casing, ensuring all components are properly seated and the HDMI port is accessible through the cutout.
-
Final Testing:
- Connect the newly converted portable monitor to a laptop or another device using an HDMI cable.
- Verify both video and audio output to confirm the successful conversion.
How to Build a Portable iPhone 6 Gaming Console
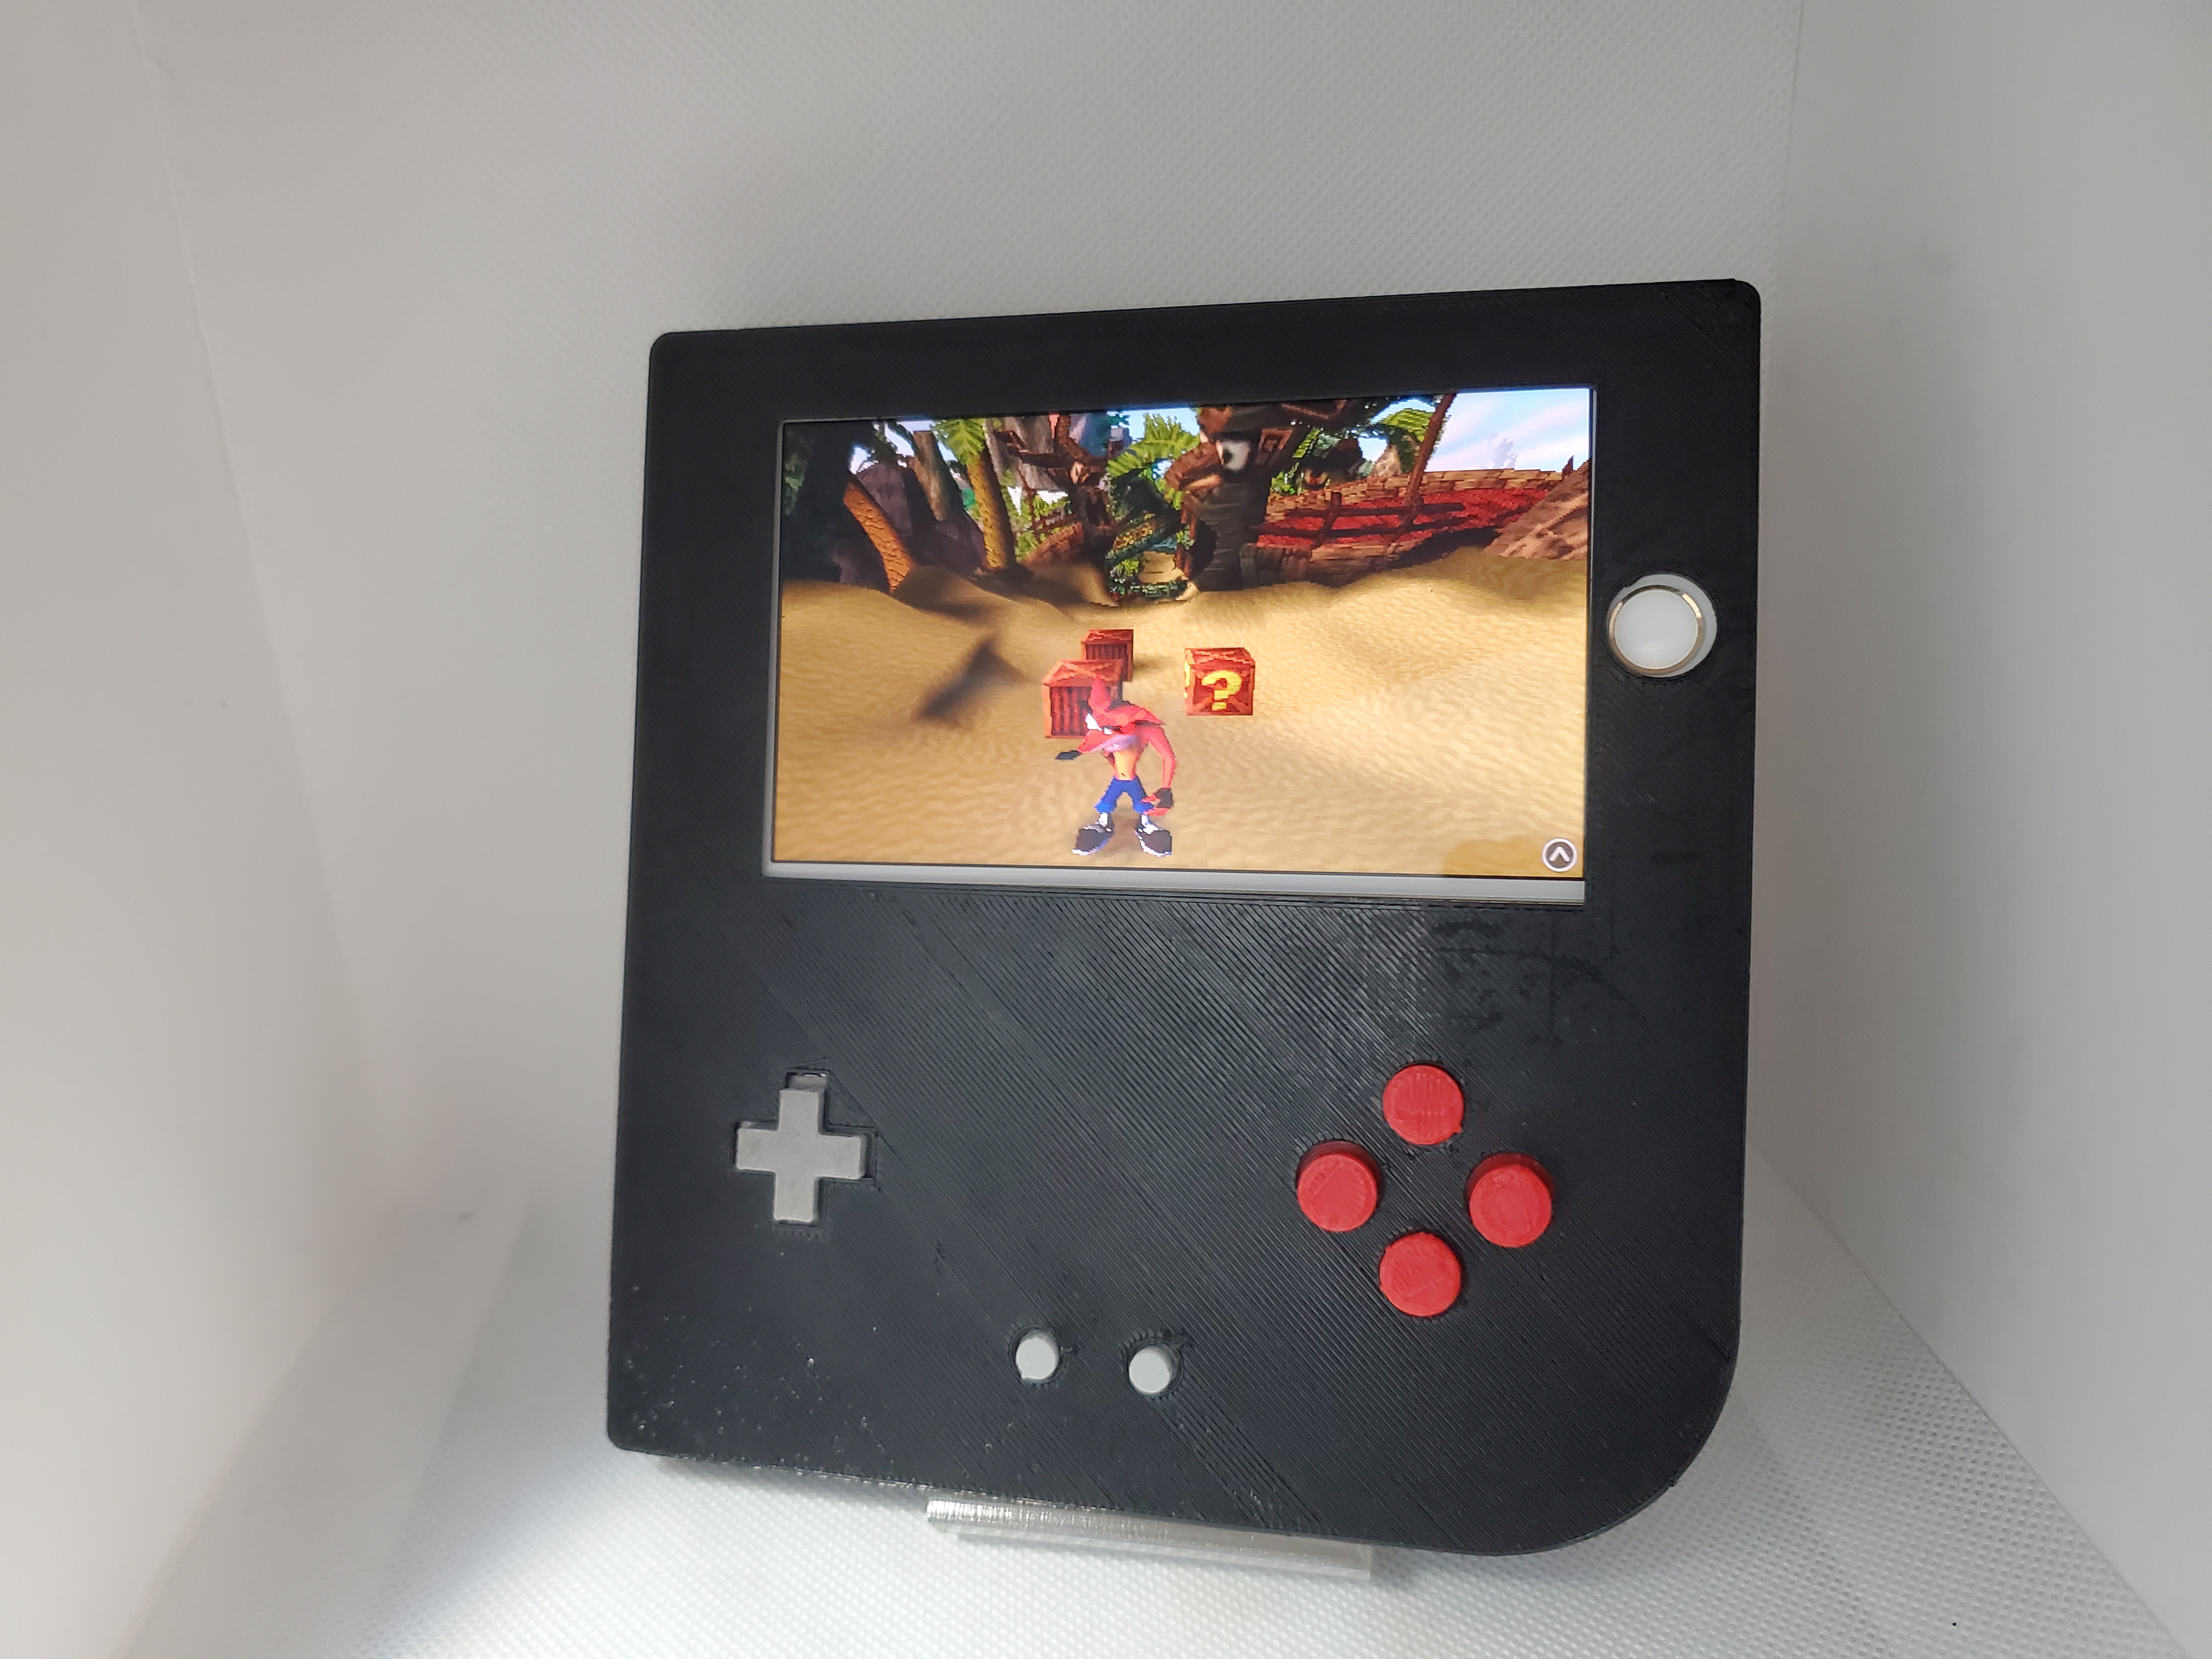
Materials You'll Need:
- iPhone 6
- 3D printer and black filament
- CAD software (for designing the case)
- Bluetooth keyboard (for the initial setup shown in the video, though the new design focuses on integrated buttons)
- Button board components (buttons, wires, etc.)
- Soldering iron and solder
Steps:
- Disassemble Your Old Setup (if applicable): If you have a previous iteration of an iOS gaming console, carefully remove the iPhone and the existing button board from its 3D-printed case.
- Design Your New Non-Invasive Case: Use CAD software to design a new 3D-printed case.
- Key Design Principle: Ensure the design is non-invasive, allowing the iPhone to be easily inserted and removed without damaging the phone.
- Focus on creating a secure fit for the iPhone while providing space for the button board.
- 3D Print the New Case: Once your design is finalized, 3D print the new case using black filament.
- Assemble the New Case with Your iPhone: Carefully place your iPhone 6 into the newly printed case. Verify that the iPhone fits securely and that the case allows access to necessary features like the power button and screen.
- Prepare the Button Board: Prepare the components for your new button board. This board should be designed to fit precisely within the updated 3D-printed case.
- Solder the Buttons onto the Board: Solder the individual buttons onto the prepared button board. Ensure all connections are secure and correct.
- Final Assembly of the Console: Install the completed button board into the designated space within the 3D-printed case. Place the physical buttons into their respective slots on the case, aligning them with the soldered components on the board.
- Test Your Gaming Console: Once fully assembled, test your new portable gaming console. Launch various games to ensure all the buttons are functioning correctly and that the overall design provides a comfortable and effective gaming experience.
Link to the Freecad and STL files: Download Feel free to use and modify the design as you want!
How to Build a Mini Pocket Computer from Broken HTC Touch Pro/Diamond Phones
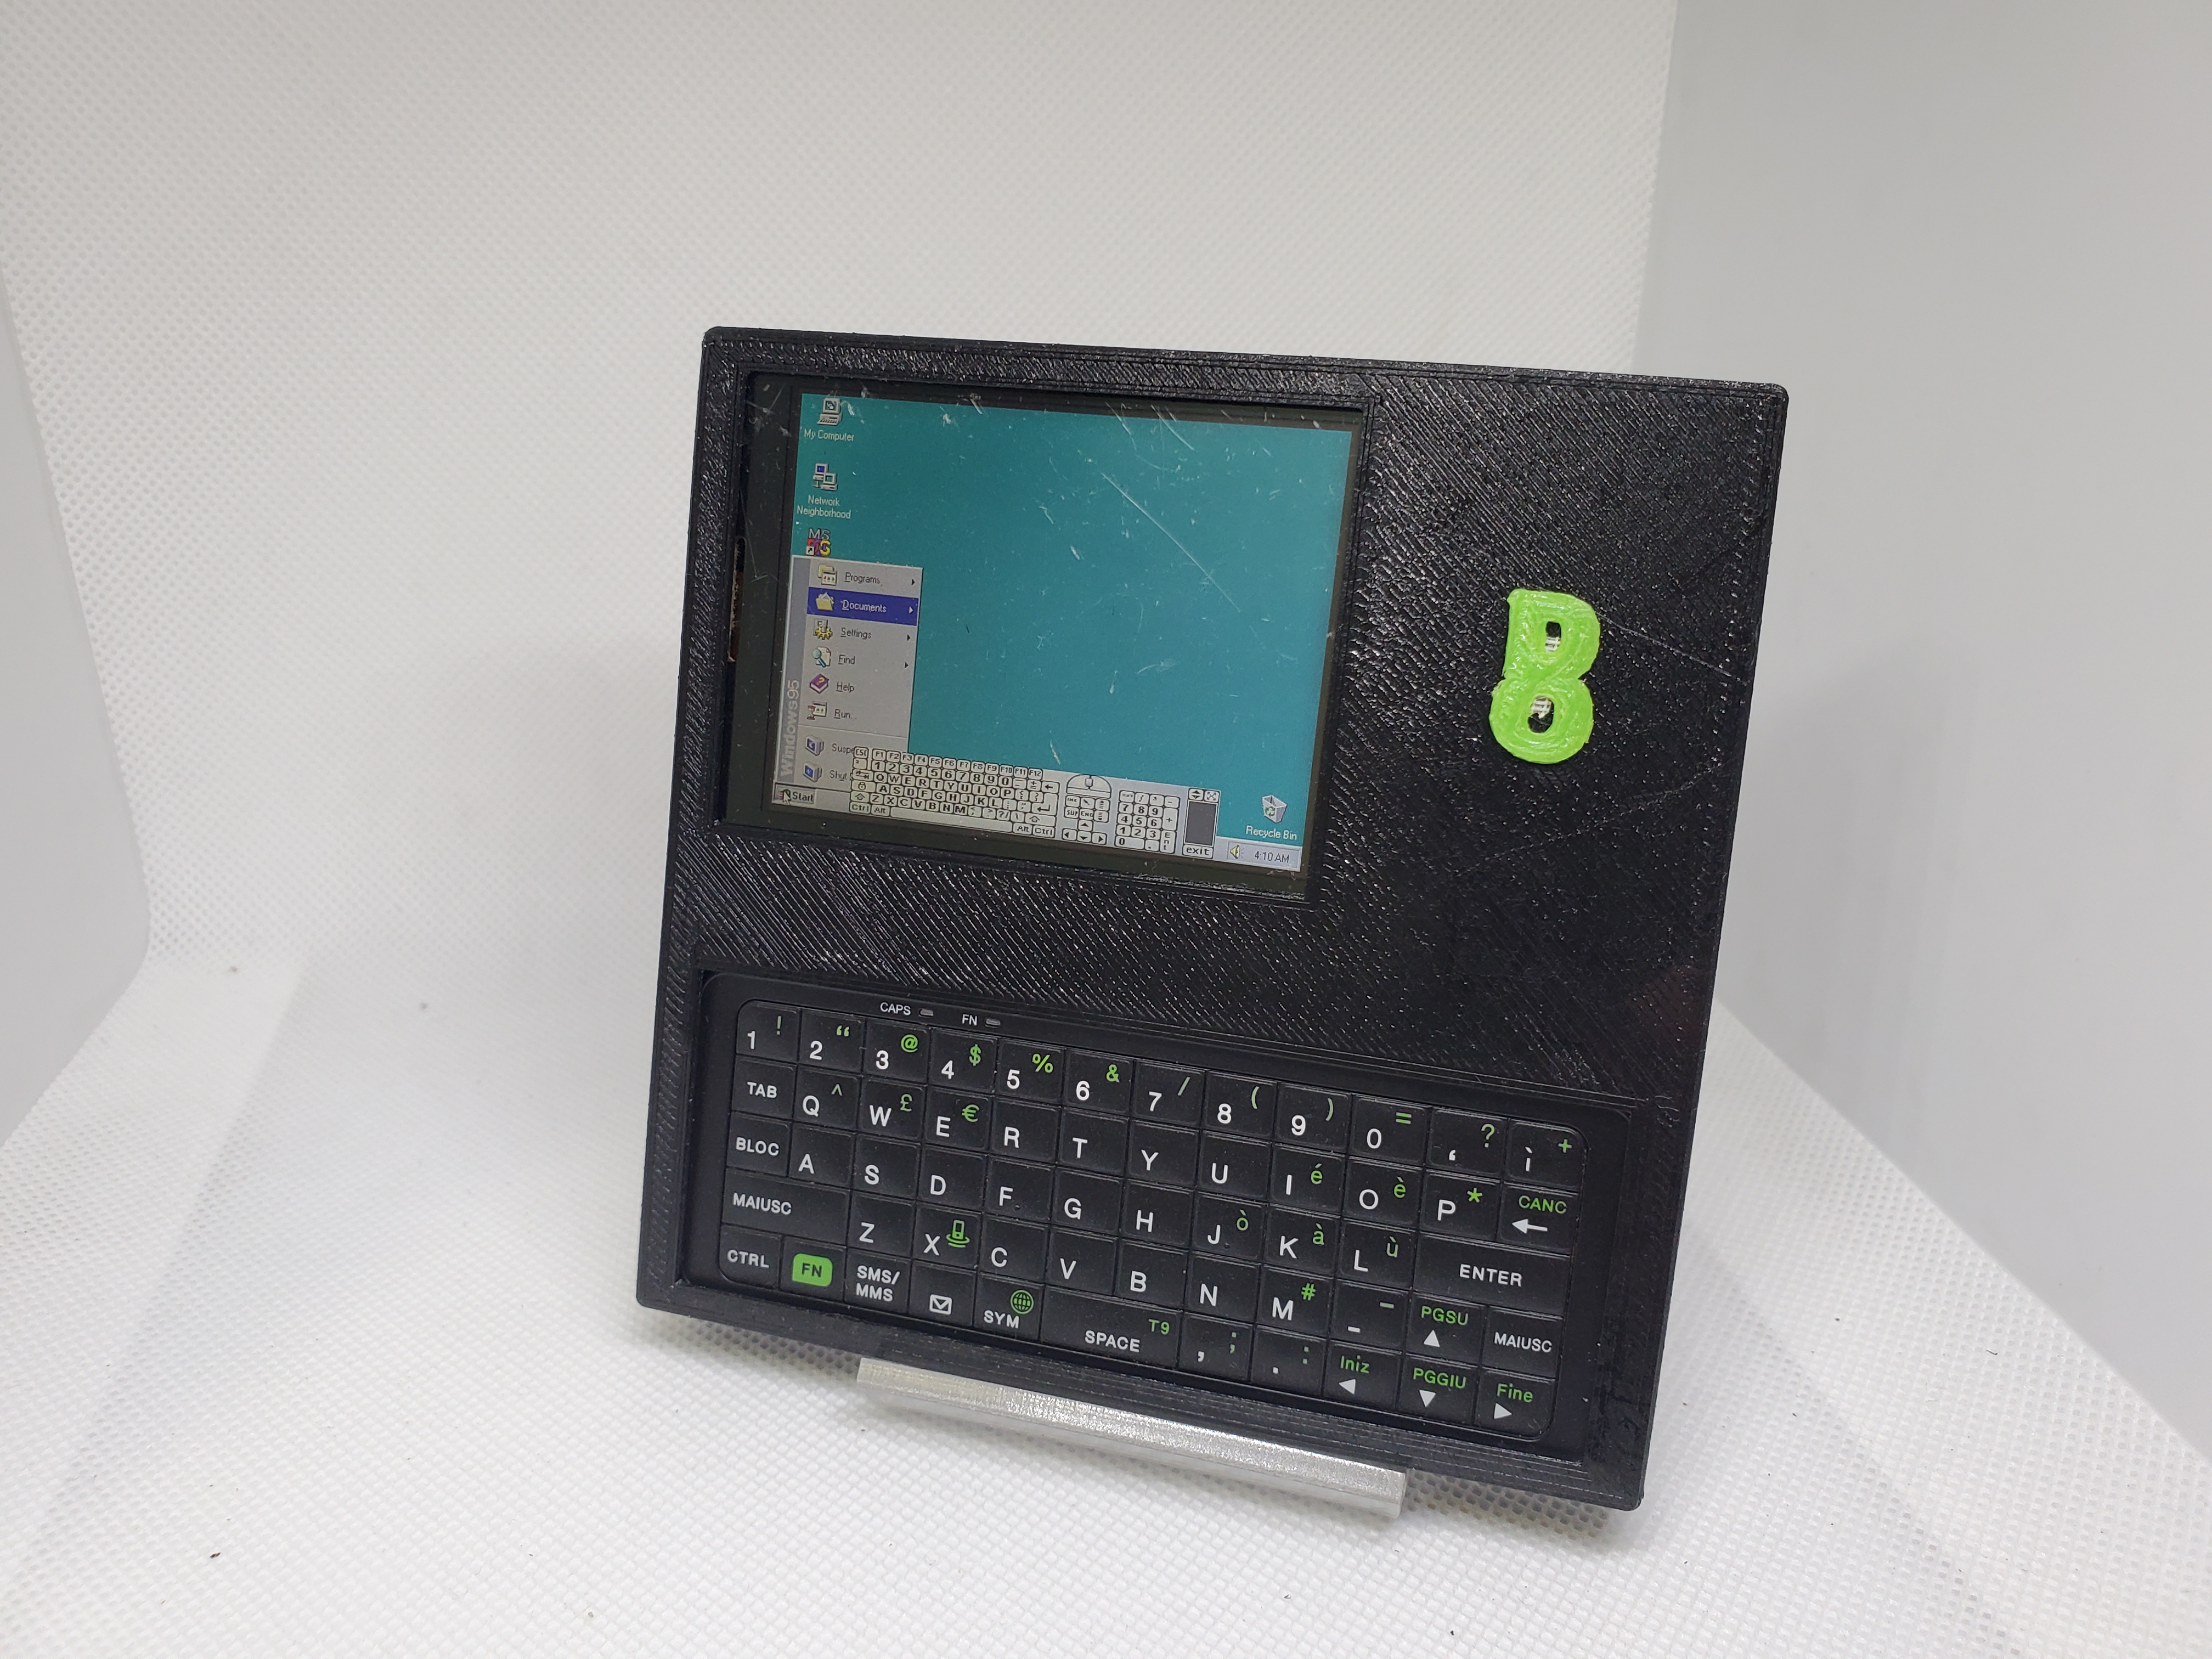
Materials You'll Need:
- HTC Touch Pro: A functional unit, ideally with a working motherboard and QWERTY keyboard. (The video used one with a non-functional touchscreen).
- HTC Touch Diamond: A unit with a functional screen and touchscreen, even if the rest of the phone is heavily damaged or non-functional.
- 3D Printer & Filament: For printing the custom enclosure.
- CAD Software: For designing the 3D-printed enclosure.
- Precision Screwdrivers/Tools: For disassembling the phones.
- Hot Air Rework Station/Soldering Iron (optional but recommended): For delicate component removal/installation, if needed.
- SD Card: For installing operating systems, emulators, and games.
- Stylus: For touchscreen interaction.
Steps:
- Assess Your Donor Phones [00:01:12 - 00:06:28]:
- Identify your HTC Touch Pro unit. This will be the "brain" of your mini computer, providing the motherboard and physical keyboard. Ensure its main functions (apart from the screen) are operational.
- Identify your HTC Touch Diamond unit. This will be the "display" donor. Ensure its screen and especially its touchscreen are fully functional. The video confirmed identical screen specifications (resistive, 600x480 VGA, 4:3 aspect ratio, 2.8 inches) for both models.
- Note: The video showed issues with damaged battery pins on one Diamond, so choose a unit where the screen can be safely salvaged.
- Perform the Screen and Touchscreen Transplant [00:07:49 - 00:10:11]:
- Carefully disassemble both the HTC Touch Pro (the receiver) and the HTC Touch Diamond (the donor). Be extremely gentle with ribbon cables.
- Extract the screen and touchscreen assembly from the HTC Touch Diamond.
- Carefully install the HTC Touch Diamond screen and touchscreen into the HTC Touch Pro.
- Reconnect all necessary ribbon cables.
- Crucial Step: Briefly power on the HTC Touch Pro to test if the transplanted screen boots up and if the touchscreen is responsive. This confirms the successful hardware transplant before proceeding.
- Design the Custom 3D-Printed Enclosure [00:10:23 - 00:19:33]:
Since the HTC Touch Diamond screen might not fit perfectly back into the original HTC Touch Pro casing due to different bezel designs, a new custom enclosure is required.
Using CAD software, design a new 3D-printed case that accommodates:
- The HTC Touch Pro motherboard and its sliding QWERTY keyboard.
- The transplanted HTC Touch Diamond screen.
The goal is to keep the device in an "open" position to prevent stress on the display's ribbon cable when sliding out the keyboard.
Measure all components precisely to ensure a snug fit.
Tip: The video creator initially missed a hole for the power button, so ensure all necessary ports and buttons are accounted for in your design.
- 3D Print and Assemble the Enclosure [00:19:33 - 00:22:57]:
- Print your designed case using your 3D printer and desired filament.
- Once printed, carefully fit all the HTC Touch Pro components (motherboard, screen assembly, keyboard mechanism) into the new 3D-printed case.
- Drill any necessary holes (e.g., for the power button) that might have been overlooked or require precise placement after printing.
- Software Setup and Testing [00:22:57 - 00:38:28]:
- Insert an SD card loaded with your desired operating systems (e.g., Windows Mobile, or emulators like Palm OS Emulator, Windows 95) and applications.
- Power on your newly assembled mini pocket computer.
- Test Emulators and Games:
- Key Mapping: The video highlighted significant issues with keyboard mapping in emulators (e.g., Age of Empires, Jazz, Palm OS Emulator). Only basic keys like Tab, Shift, Enter, and Backspace were consistently recognized, often requiring extra steps to send key presses. Be prepared to troubleshoot or use the stylus for input where keyboard mapping fails.
- Performance: Test the performance of various applications. Older operating systems like Palm OS ran relatively well. Windows 95 was functional but very slow.
- Graphics: Some games (like Quake/Quake II) might produce sound but no image, suggesting potential limitations with the phone's GPU or lack of proper graphics drivers.
- Troubleshooting: If you encounter persistent keyboard mapping issues, as seen in the video, a full reset of the device or further investigation into custom ROMs/drivers might be necessary.
Link to the STL file: Download Feel free to use and modify the design as you want!
Build a round Gaming Console
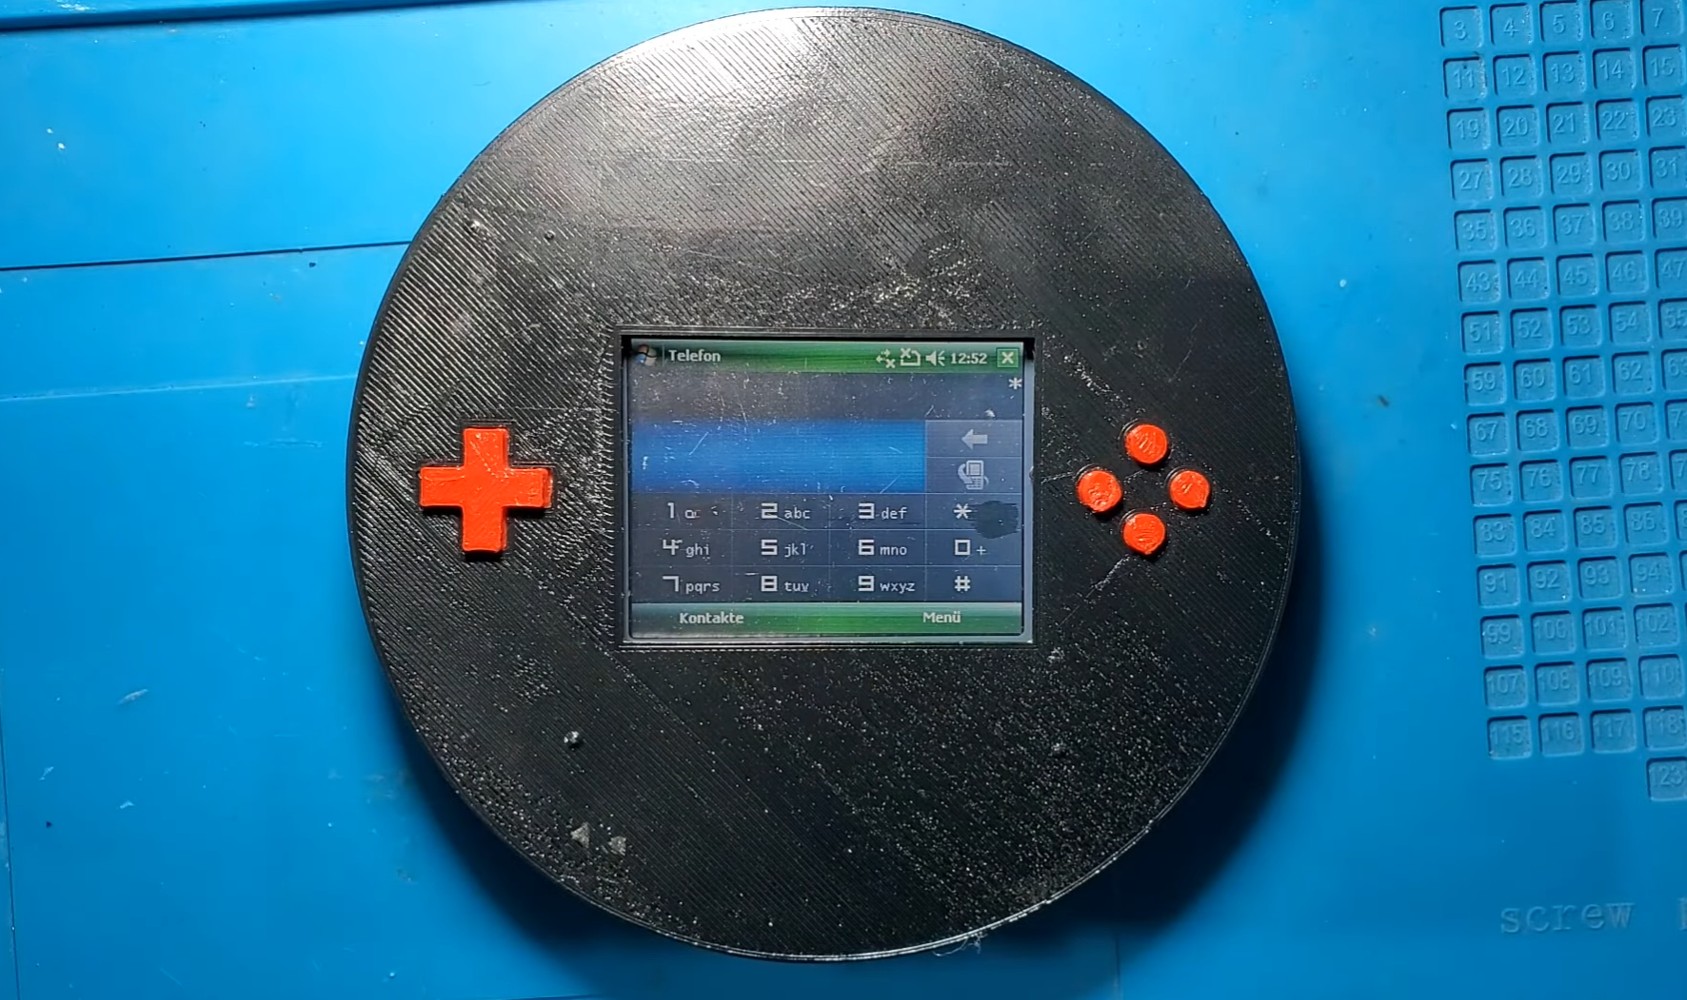
Materials you'll need:
- Old HTC smartphone
- 3D printer
- Filament
- Gaming controls (buttons, joystick, etc.)
- Wires and soldering supplies
- Basic hand tools (screwdrivers, wire cutters, etc.)
Steps:
- Choose and prepare a smartphone:
- Select an old HTC smartphone, similar to the one used in the video.
- Design and 3D print the case:
- Create a custom design for a round case that will house the phone's screen and controls.
- Use a 3D printer to print the case.
- Assemble and test the console:
- Place the phone inside the custom-designed case.
- Connect the gaming controls.
- Test the completed console by playing various games and emulators.
The creator of the video tested the console by playing the following:
- An NES emulator game.
- Grand Theft Auto on a Game Boy Color emulator.
- Another Game Boy game.
- The Windows Mobile version of Call of Duty.
- Windows 95 using a QEMU launcher as a proof of concept.
Link to the STL files: Download Feel free to use and modify the design as you want!
How to Build a Sony Ericsson Gaming Console
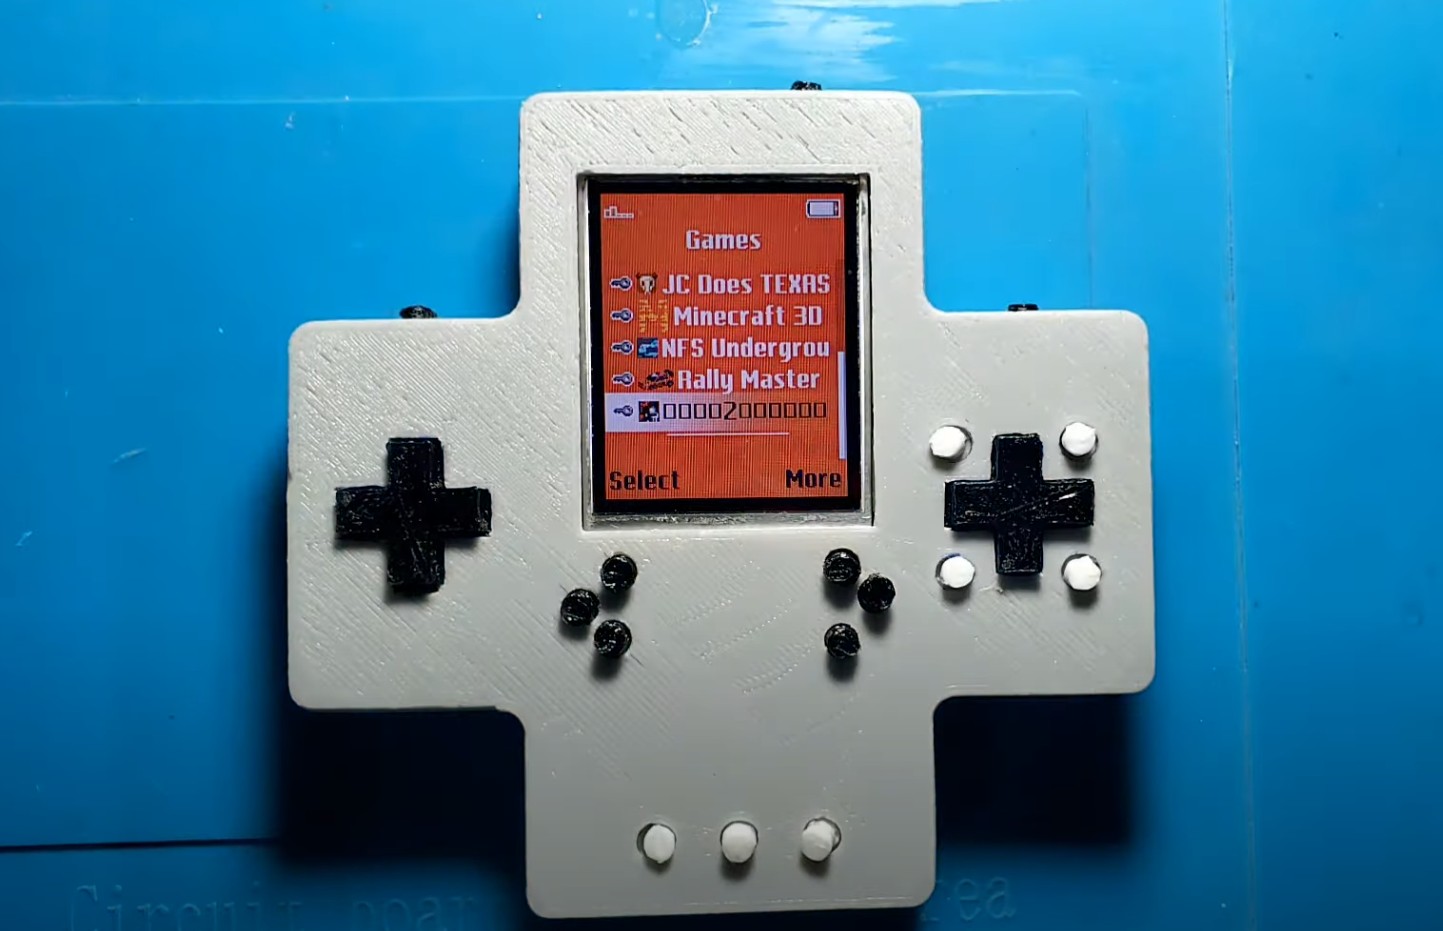
Introduction and Rationale
The goal of this project is to create a dedicated gaming console by repurposing an old Sony Ericsson phone. The creator notes that while some Java phones can run emulators for systems like NES and Game Boy, the performance is often poor. This tutorial focuses on playing the phone's native Java games, which are described as being high-quality and numerous.
Step 1: Obtain a Sony Ericsson phone
The project is built around the Sony Ericsson phone itself. The video does not specify a model, but shows a phone with a portrait-oriented screen.
Step 2: Design the custom console body
- 3D Printing: The console body is designed to be 3D printed. This custom case is what transforms the phone into a console.
- Physical Layout: The case is designed with the following features to accommodate the phone and gaming controls:
- D-Pad: A dedicated directional pad for primary movement.
- Number Keys: Keys 1 through 9 are included, with 2, 4, 6, and 8 also acting as a secondary D-pad for games that utilize those specific controls.
- Triggers: The console features trigger buttons.
- Phone Keys: Other buttons are included to correspond to the phone's original keys.
- Charging: A connector for charging is integrated into the design.
Step 3: Assemble the console and test with games
Once the case is printed and the phone is installed, the console is ready for use. The video demonstrates its performance with the following Java games:
- Asphalt
- Bounce
- Doom
- Galaxy on Fire
- Half-Life: Escape from CT 17
- Minecraft
- Need for Speed
- Rally Master
- Age of Empires 2
Link to the STL files: Download Feel free to use and modify the design as you want!
How to Build a Windows XP Mini-Laptop from an Android Phone
Introduction
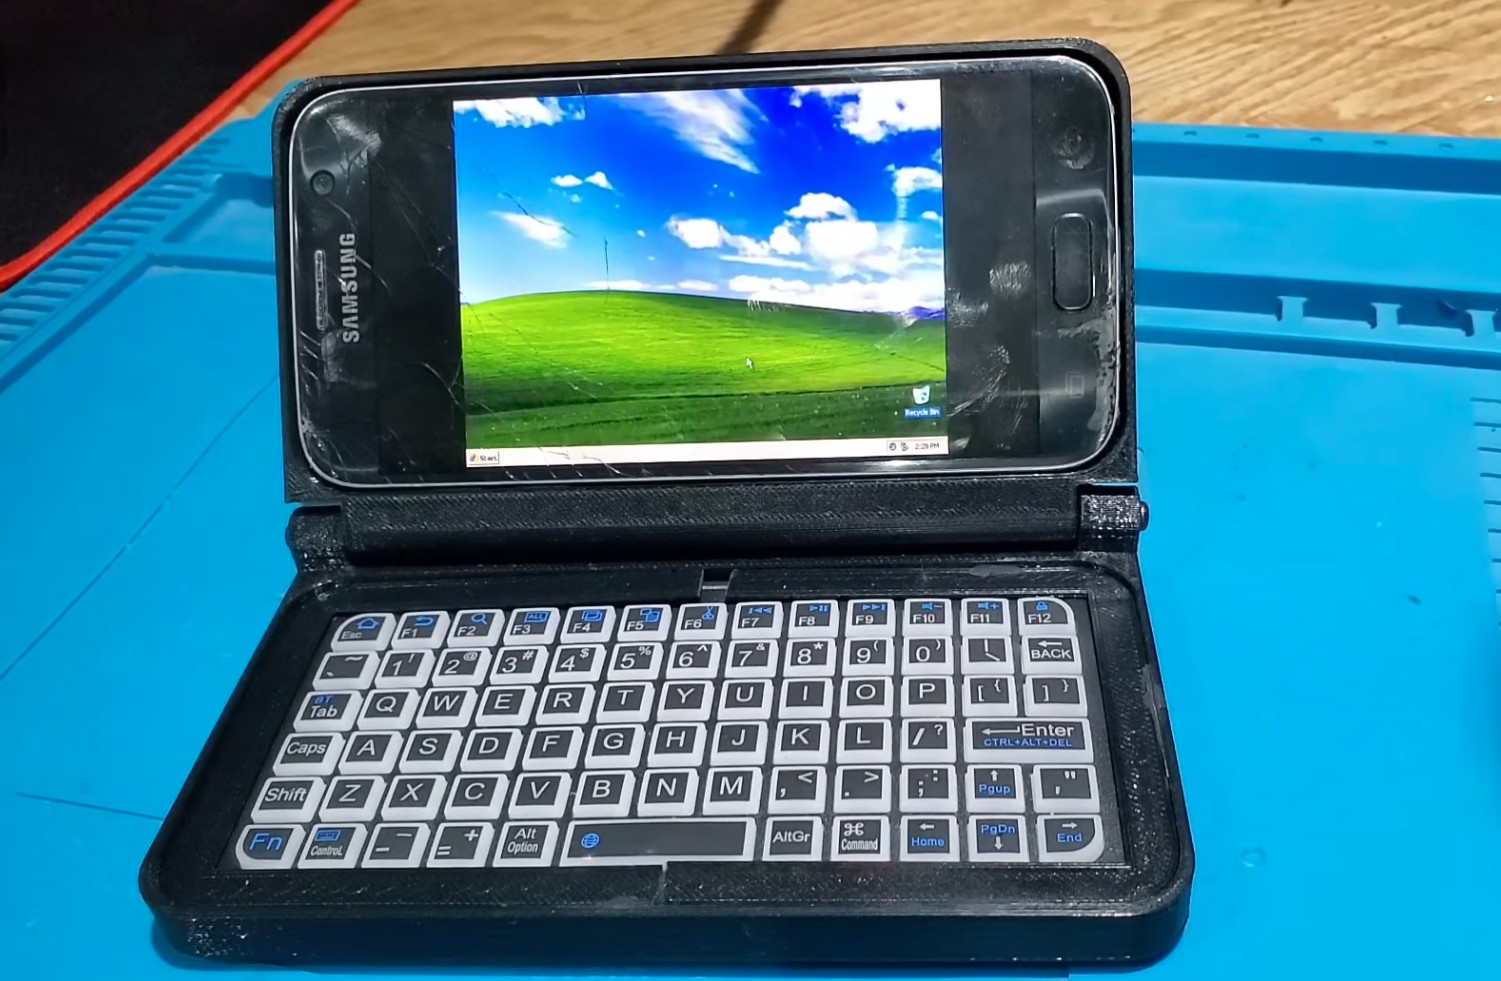
This project transforms an old Android smartphone into a functional mini-laptop running Windows XP. The video uses a Samsung Galaxy S7, but the process can be adapted for other Android devices. The key components are a 3D-printed case and an Android emulator.
Step 1: Gather Materials
- An old Android smartphone (a Samsung Galaxy S7 is used in the video).
- A small physical keyboard.
- A 3D printer and filament for the custom case.
- An emulator application for Android, such as Limbo PC Emulator, to run Windows XP.
Step 2: Design and Print the Custom Case
- The video demonstrates a two-part 3D-printed case. The case's design is crucial as it integrates the smartphone and the keyboard into a single, compact unit.
- The case includes a hinge mechanism to allow the screen (the phone) to open and close like a laptop.
- The design also includes cutouts for the phone's camera, charging port, and headphone jack, if necessary.
Step 3: Install and Configure the Emulator
- Install the Limbo PC Emulator (or a similar emulator) from the Google Play Store or an external source.
- Inside the emulator, create a new virtual machine.
- Configure the virtual machine settings, such as RAM and CPU cores, to a level that is suitable for the Android phone and the Windows XP operating system.
- Point the emulator to a Windows XP installation file (an ISO or a pre-configured image).
- Start the virtual machine and follow the on-screen prompts to install Windows XP.
Step 4: Demonstrate Functionality and Use
The video shows the creator testing the completed laptop with several applications:
- 3D Design: The creator successfully uses FreeCAD to design a small object and Cura to prepare the model for 3D printing. This is the project's key proof of concept.
- Music Playback: Winamp is used to play a song, demonstrating audio functionality.
- Gaming (Attempt): The creator tries to run a game called "Open Tyrant" but it fails to load. This highlights the limitations of the setup.
Link to the freecad files: Download Feel free to use and modify the design as you want!
How to Build a QWERTY Keyboard Case for the Samsung Galaxy S24 Ultra
Introduction and Rationale
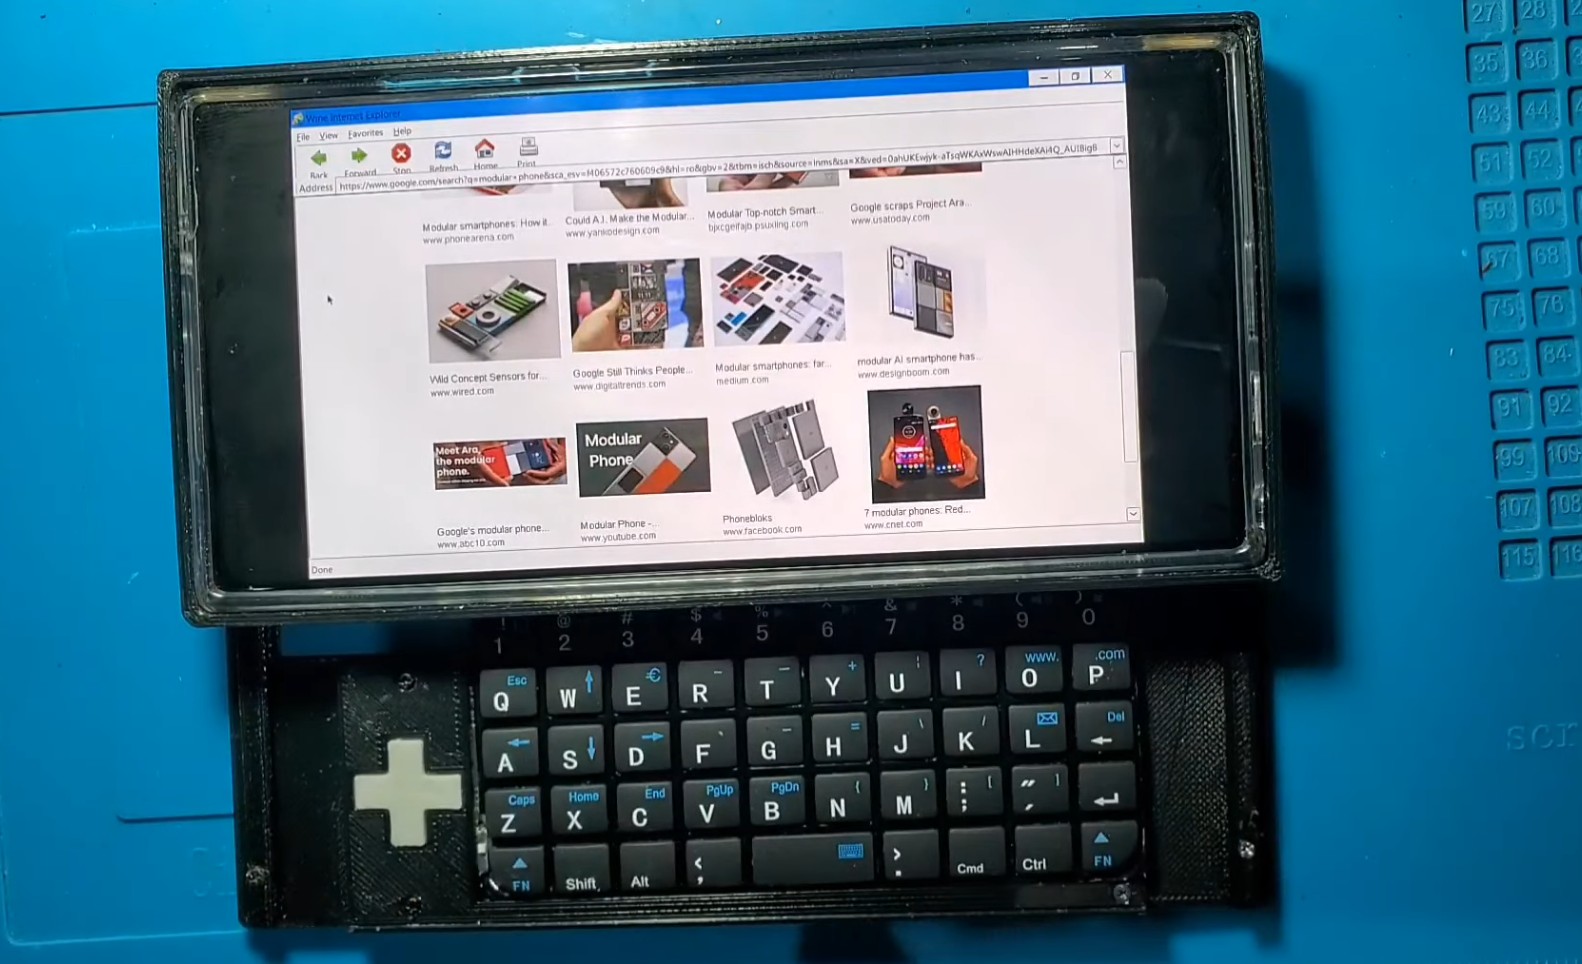
The goal of this project is to create a more practical and portable QWERTY keyboard case for the Samsung Galaxy S24 Ultra. The new design is a significant improvement over the creator's old, bulky case, which was not suitable for everyday use. The new case is designed to be much thinner and can remain on the phone at all times.
Step 1: Gather the Necessary Materials
- Samsung Galaxy S24 Ultra: The phone for which the case is being built.
- Thin Bluetooth Keyboard: A small, thin keyboard is crucial for the new design.
- Cheap Rubber Case: A basic rubber case for the phone serves as a base.
- 3D Printer: Needed to create the custom case.
- PETG Plastic: The creator specifically recommends using PETG filament instead of PLA. PETG is chosen because it is more flexible, stronger, and more resistant to impact, making it ideal for a phone case that needs to withstand daily use.
Step 2: Design and 3D Print the New Case
- The case needs to be designed to integrate the phone, the rubber case, and the Bluetooth keyboard into a single, cohesive unit.
- The design should be significantly thinner than the previous one, allowing for daily use without adding excessive bulk.
- The case should have cutouts for the phone's camera, ports, and buttons.
- Print the case using PETG plastic for durability.
Step 3: Assemble the Components
- The video shows the creator transferring components from the old case into the new, 3D-printed PETG case. This includes the keyboard, triggers, and any other electronics.
- Secure the components within the new case.
Step 4: Test and Explore Functionality
- Gaming: The creator tests the assembled case by playing games on an NES emulator and a 3D game. The keyboard and triggers work well for a gaming experience.
- Modular Concept: The creator discovers that the keyboard can be easily detached, allowing it to function as a remote control for the phone. This leads to the idea of a modular system where other attachments, like a dedicated gaming module, could be swapped in and out.
Link to the STL and freecad files: Download Feel free to use and modify the design as you want!